


It is probably true that the vast majority of digital camera owners have never considered calibrating their cameras. However, camera calibration is arguably a final but important stage in the achievement of a completely calibrated and profiled colour management system.
 The process
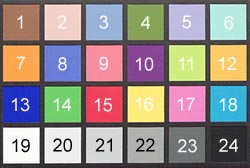
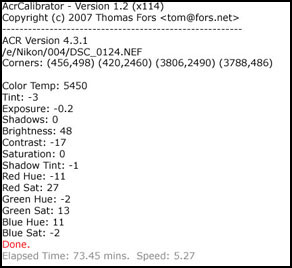 is comparatively simple.The principal requirements are a colour checker chart, such as the Macbeth Colour Checker, and the Adobe Camera Raw (ACR) Calibrator script which is available a a free downloadable plug-in for Adobe Photoshop. This script also works with Adobe Lightroom and Camera RAW. Place the colour checker card (see image on left)) in direct sunlight in a location well away from the possible influence of colour casts. Lots of green vegetation produces a distinct green cast, and coloured walls produce a cast similar to the physical colour of the wall. Photograph the colour checker card in RAW mode. With the camera's lens perpendicular to the plane of the card, get as close as possible to more or less fill the frame with the coloured squares of the target. Have a look at the histogram of the image and make sure that all the colours are properly exposed and correctly rendered. It is probably worth taking a number of shots using exposures set in small increments on either side of the metered value.
Having selected the best image, launch Photoshop and open the target image in ACR. To speed up processing, set the image size to the smallest ACR will support for your camera. Also set the colour depth to 8 bits/channel. Then select the white balance tool (or eyedropper) from the ACR window, and click in the second whitest patch in the bottom row of the ColorChecker target as seen in the image above). This gives the ACR script the best starting point to begin processing. Note that the target can be photographed in any orientation, but the target patches must still be selected in the required order (below). Click the open button to load the target image in to Photoshop.
The patches are marked using the pen tool - not the freeform pen tool. Shift-P toggles between the two pen tools. Click once in the centre of each of the four corner patches of the target image. This identifies their positions for the ACR script. The patches must be clicked in the following sequence:
- Dark skin (top left in image above)
- White (bottom left)
- Black (bottom right)
- Bluish green (top right)
 This creates a path and places a square of solid colour over most of the image. The script must be run immediately after clicking the patches with the pen tool. Do not save the image as this will change its file type and prevent the ACR script from running correctly. Run the script by selecting the ACR Calibrator option from the File - Scripts menu. As the script runs the following messages should be displayed:
- Working on White Balance
- Working on Gray Patches
- Working on White Balance (2nd pass)
- Working on Shadow Tint
- Working on Green Calibration
- Working on Blue Calibration
- Working on Red Calibration
- Working on Green Calibration (2nd pass)
- Working on Blue Calibration (2nd pass)
- Working on Red Calibration (2nd pass)
- Working on Green Calibration (3rd pass)
- Working on Blue Calibration (3rd pass)
- Working on Red Calibration (3rd pass)
- Done
When finished, the script should produce a small table of results of the type illustrated at top right.
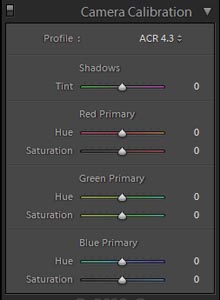
The final stage is to find the necessary control panel in Camera RAW or Lightroom (see right) and enter the offsets produced by the ACR script. In Lightroom the menu is found in the "Develop" section at the bottom right-hand corner of the scree - it may be necessary to scroll down). Start with the shadow tint and work progressively down the list. The set of values can then be saved with a suitable name that links them to the particular camera used. The saved offsets can then be applied to all images taken with the particular camera. Their effect is normally subtle or may even pass unnoticed, but the colours in the images will be more accurate as a result.
It is also possible to calibrate a digital camera using Adobe's DNG Profile editor - a simple program that is available as a free download from the Adobe website. The procedure is relatively simple and results in a camera profile incorporating the specific characteristics of your cameras sensor (under given lighting conditions).
To perform a calibration:
- Photograph a standard colour target in the manner described above;
- Open DNG Profile Editor;
- Launch DNG Profile editor and load the target image;
- Centre the four corner marks on the four appropriately coloured corner squares;
- Generate the profile;
- Export the generated dcp file which is automatically placed in the correct folder.